To configure the rp-l2tpd VPN server, we require a Linux system with minimum of two network interfaces. I use Centos 5 Linux operating system for my VPN installation. You can also use other Linux’s flavors, but avoid using Fedora Core 8. Fedora Core 8 has some bug in pppd that doesn’t accept the connection from client.
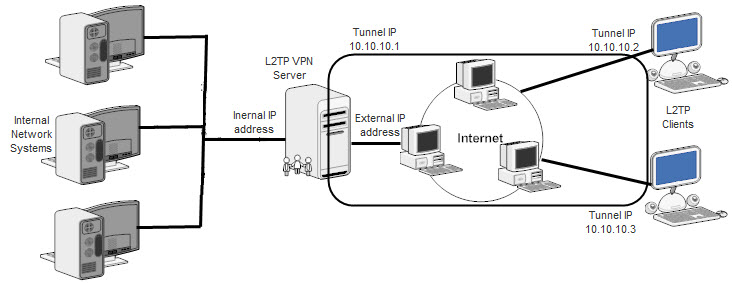
L2TP (Layer 2 Tunneling Protocol) is a tunneling protocol used for VPNs. It uses the UDP port 1701 to communicate. It doesn’t have any encryption, but we can encrypt the L2TP packets by using it with IPSec. For theoretical information on L2TP you can visit its Wiki.
In Linux, you can find so many different applications to build a L2TP server but there is no proper documentation for this. Also, I think no one is using L2TP VPN nowadays. But my requirement could solve by L2TP only. I wanted to configure the VPN for some old devices that does support only L2TP VPN.
I use Centos 5 Linux for VPN server. For VPN application, I use the combination to two applications. One is xl2tpd & rp-l2tpd.
Ialso had the option of openl2tpd, I tried this on Fedora 8 Linux but there is some bug on fedora 8’s pppd, which stopped me to use that. And when I tried to install openl2tpd on Centos 5, it asked to enable the L2TP support on kernel. I didn’t want to play with kernel that time.
That was the reason, I switched to xl2tpd application. It is the same application l2tpd but maintainedby Xelerance Corporation. I don’t use l2tpd due to some compilation problem. I also face the compilation problem with xl2tpd, but it was manageable. You will also see the use of rp-l2tpd, it is also solving some dependency problem for xl2tpd.
root@rahul-pc~# tar –xvf xl2tpd-1.2.4.tar.gzroot@rahul-pc~# cd xl2tpd-1.2.4
root@rahul-pc~# make
When you give the make command, it can show you some error on compilation (especially on fresh installed Centos 5 system, may be due to some dependencies), but creates the xl2tpd binary. You can use that binary for configuring L2TP VPN server. Copy that binary to /usr/local/sbin/ directory.
root@rahul-pc~# cp xl2tpd /usr/local/sbin/
xl2tpd.conf
Also copy the xl2tpd.conf file, from the examples directory on your xl2tpd source directory, to /etc/xl2tpd/ directory (you need to create that directory as you installing the xl2tpd manually).
Change the xl2tpd.conf according to your usage; means change the IP address in conf file that you require for your VPN network i.e. tunnel IP address. In my case xl2tpd.conf file look something like this.
;; This is a minimal sample xl2tpd configuration file for L2TP without IPsec.
;
; The idea is to provide an L2TP daemon to which remote L2TP clients can
; connect. In this example, the internal (protected) network
; is 192.168.1.0/24. A special IP range within this network is reserved
; for the remote clients: 10.10.10.0/24
; (i.e. 10.10.10.1 ... 10.10.10.254)
;
; The listen-addr parameter can be used if you want to bind the L2TP daemon
; to a specific IP address instead of to all interfaces. For instance,
; you can bind it to the interface of the internal LAN (e.g. 192.168.1.98
; in the example below).
[global]
; listen-addr = 192.168.1.98
;
; requires openswan-2.5.18 or higher - Also does not yet work in combination
; with kernel mode l2tp as present in linux 2.6.23+
; ipsec saref = yes
; forceuserspace = yes
;
; debug tunnel = yes
; L2TP Network Server configuration.
[lns default]
ip range = 10.10.10.2-10.10.10.254
local ip = 10.10.10.1
; Always use CHAP instead of PAP, it will provide you a little security
; with L2TP (without IPsec).
require chap = yes
refuse pap = yes
require authentication = yes
name = LinuxVPNserver
ppp debug = yes
; PPP option file name, it may use /etc/ppp/options by default, if you comment this
pppoptfile = /etc/ppp/options.xl2tpd
length bit = yes
You can modify this file according to your requirement. The entire configuration is completed from xl2tp side, now time to configure the PPP parameters.
options.xl2tpd
First of all, create a file named /etc/ppp/options.xl2tpd (option file name written in xl2tpd.conf file) with following entries.
ipcp-accept-localipcp-accept-remote
ms-dns 192.168.22.240
ms-wins 192.168.22.240
noccp
auth
crtscts
idle 1800
mtu 1410
mru 1410
defaultroute
debug
lock
proxyarp
connect-delay 5000
You can change your dns & wins server IP address in the file. You can also add some other parameters that are supported by your pppd, like require-mschap-v2, see the man page of your pppd.
chap-secrets
Put your authentication on /etc/ppp/chap-secrets file.
# Secrets for authentication using CHAP# client server secret IP addresses
"username" "*" "password" "10.10.10.2"
The IP address field is showing the remote tunnel static IP address. You can assign the dynamic IP addresses also by using radius server & dhcp-pppd plugin etc. But I don’t know what is the easiest method to do this & how to. Also my requirement is completed by using static IP address. But I want to know its other methods also. Anyone, who can put some light on this, please writes.
Same chap-secrets file can be used, if you are using mschap protocol in option file.
Running xl2tpd
After doing the entire above configuration, you can start xl2tpd. Give the following command.
xl2tpd -D
-D option is opening the debug of xl2tpd. It is recommended to start the application in debugging mode at first time (during testing time). Remove –D option to stop the debugs.
When you try to run xl2tpd, it will show you a error for /var/run/xl2tpd/l2tp-control not found. This l2tp-control file can be extracted from rp-l2tpd application. Or you can compile the xl2tpd properly, may be it will gives you the l2tp-control binary. You can also try this by creating a blank non-binary file by using touch command (I didn’t try this, it’s just a silly ideaJ).
Download & compile rp-l2tpd to get the l2tp-control
I am not going to define LDAP very deeply. Simply, it is a lightweight version of Directory Access Protocol (DAP), which is a part of X.500, a standard for directory service in a network.
Overview
LDAP can be used for different purposes. Some people use it for maintaining their centralized email address book, for building the domains, for authentication of users from centralized database, for querying and modifying the other directory services etc.
I am using the LDAP for building a centralized authentication database, where all remote users can authenticate.
A LDAP client connects the server by using TCP port 389. It sends the authentication request & the server sends the responses in return after authenticating the username. But all these communication is unsecured; we can secure this communication by using TLS with LDAP. The default port for the secure LDAP communication is 636. It is denoted as ldaps in URL schemes.
For more theory on LDAP you can visit LDAP wiki. Time for some practical.
Installation So many people like to use GUI & CUI tools to download & install the openLDAP package directly from the internet like yum in Fedora/Centos, apt in Debian and Add/Remove Package in Fedora or Redhat.
But I prefer to download the source package and install it manually. Manual process can be used to load the package on embedded application also but the GUI & some CUI tools can create so many problems while loading.
After downloading the openLDAP package, install it by following commands:
[root@rahul-pc~]# tar –xvf openldap-VERSION.tgz
[root@rahul-pc~]# cd openldap-VERSION
[root@rahul-pc~]#./configure
[root@rahul-pc~]# make depend
[root@rahul-pc~]# make
[root@rahul-pc~]# make test [root@rahul-pc~]# make install
During installation of any open source package in Linux there may be some dependencies, but I didn’t find any dependency for openLDAP with my O.S. (I was using Fedora core 8).
LDAP Server Configuration
After finishing the installation of openldap package, configure the sldap.conf file in /usr/local/etc/openldap/ directory. If you used the rpm or deb package for the installation then your slapd.conf file location may be changed to /etc/openldap/ directory. But that’s not a big problem; you can give the path of your configuration file during the initialization of service.
Before starting the sldap.conf file configuration, create the LDAP “root” user password. It can be created only by root, by giving the following command.
[root@rahul-pc~]# slappasswd
New password:
Re-enter new password: {SSHA}oph6+eOAY0S1zDzugZjQ0AGxs9FFfhrV
The above output is required to add in sldap.conf file.Edit the file sldap.conf and change the following things in the file for our scenario:
Check the path of LDAP database directory in configuration file.
directory /usr/local/var/openldap-data
Now you can start the sldapd service, by giving the following command:
[root@rahul-pc~]# /usr/local/libexec/slapd –d 1
Note: “-d 1” option is used for full debugging, to test any problem in sldapd service. Debugging mode is very helpful to diagnose the problem, if any, comes on further steps.
After starting the sldapd service, you can convert the local users of server to LDAP users. In order to import all local user to LDAP or selected users to LDAP, you must convert the user info file (/etc/passwd) to the ldif (LDAP Data Interchange Files). You can do this by using migrate_passwd.pl script with openldap package. But if you are using source package to install the openldap, then you need to download this script from the given link.
In first step Change the dn entry from migrate_common.ph to suite your setup. Default dn is dc=padl,dc=com & you need to change the word padl with word coral (my dn entry in sldapd.conf file)
You also need to change the cn: root to cn:Manager in the ldif file.
Next, you have to create a *.ldif file for our domain name “coral.com”. This can be done by creating a file named “coral.com.ldif” with following entries or use some example file with the package.
dn: ou=People, dc=coral,dc=com
ou: People description: All people in organization
objectClass: organizationalUnit
NOTE: Two dn entries must be separated with one blank line, otherwise it can show some during the import process.
Now the only step left is to import the ldif file to LDAP. First you need to import the domain info (coral.com.ldif) & than user info (ldapusers.ldif). This is done as shown below, first domain info.
[root@rahul-pc~]# ldapadd -x -D "cn=Manager,dc=coral,dc=com" -W -f /etc/openldap/coral.com.ldif
Enter LDAP Password:
adding new entry "dc=coral,dc=com"
adding new entry "ou=People, dc=coral,dc=com"
and user info
[root@rahul-pc~]# ldapadd -x -D "cn=Manager,dc=coral,dc=com" -W -f /etc/openldap/ldapusers.ldif
Enter LDAP Password:
adding new entry "uid=naruto,ou=People,dc=coral,dc=com"
The LDAP is now configured & running. Now time to configure the LDAP client.
LDAP Client Configuration
To configure the client machine you can use the tools authconfig-tui (GUI type) or authconfig (Console based). To use authconfig-tui give the following command
[root@ldap-client~]# env LANG=C authconfig-tui
NOTE: “env LANG=C” parameter is used to avoid the jumbled output because of our command line shell’s language incompatibility.
After this command following screen will appear:
Select Use LDAP & then Next. It opens the next screen to enter the LDAP server name or IP address, enter the DN information & select OK.
This wizard will configure your client machine. Testing
Now you can test this by doing ssh on client machine IP with any ldapusers. You should ensure that the ldapusers, you are using for ssh, are not created on client machine. It will automatically go to LDAP server for authentication and connect to LDAP client.
This is my first post in this blog. I am going to explore the security features of Linux in this blog. I already created a similar blog, named http://secureurlinux.blogspot.com. Same topics you can also find there. But that blog was written by me when i started the study on Linux Security. And this time i am going to explain each & every topic with my experience. What the problems i faced during the installation & configuration of any security feature, i will try to explain my best. So keep in touch with my website to get the updated information.